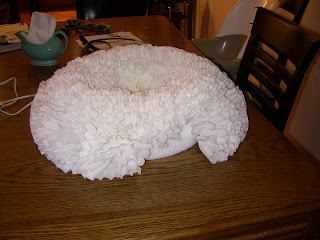
It's taken me a couple of hours spread over a couple of days to finish my beloved, but oh so LARGE coffee filter wreath. The not so brilliant me was trying to multi task when I started this project. I won't give it away, just wait and you will see.
Here was my inspiration in allllllll its glory
I tried to get good pics, but remember peeps, I have a camera that's protesting all past, present and future picture taking and so I'm using a combo of my video camera as well as my phone. Hang with me........
I used a 12" Styrofoam ring, in white of course. I did this so I didn't have to spray paint it. (Hobby Lobby and I, well we are tight, like reaaaaaal tight. BFF's foreva.) I got the ring for 7.99 but used a 40% off coupon. The glue sticks I already had on hand and the coffee filters I grabbed at my local Dollar General for 1.48 I believe. I had to grab another one though, because as you will find out, it takes a pile of them to fill the wreath in. One thing I don't have in this pic is the sharpie marker I used. More on that in a minute.
I started on the inside of the ring and worked my way out. I really hadn't gone through any tutorials on this, just kind of played with it as I went. I was the only adult around while I attempted this project, so the pictures aren't real action kind of shots. I guess I could have attempted to have my 4 or 2 year old take pictures of me. Not a chance.
What I did was take the sharpie marker and place it in the center of a filter. I then wrapped the filter around it and placed a dab of hot glue on the filter at the end of the sharpie marker. Understand? Perfect! Keep with me............
I then placed the filter in the middle of the inside of the ring using the sharpie, so I wouldn't burn my fingers, and held it in place for about 5-10 seconds depending on how much glue I had oozed onto the filter. Remember, I was multi tasking. Making supper, doing laundry, trying to entertain two little boys and when I wasn't paying attention..................this happened. Hurt like mad! I had glue on three out of ten of my fingers and the NOT SO BRILLIANT side of me decided instead of letting the glue dry and then pulling it off, I should just pull it off after it had made an instant blister on the top of my finger. Advil? Yes PLEASE! Stupid. Yes I know. Enough said. Quick and painful lesson taught to my children on why NOT to play with something when mommy tells you not to. They got the hint.
Here is what it looked like once I got completed with the middle of the inside ring. I placed the filters probably a half an inch apart. (See I really did use the sharpie ;) )
My next layer was put on the edge of the inside of the ring or just above the layer I just did. See how much fuller it gets with each layer? New camera needed STAT!
After the last layer on the inside of the ring was finished, I started a layer on the top towards the middle of the ring, then went to the outside edge of the top of the ring. You are going to have to play with yours a little as it depends on how full you want it.
Of course this wasn't the finished product yet, I'm merely trying to show how "spacey" my filters were. I had to go back and insert an entire row of fillers. Don't stress if yours seems just as spacey as mine. The beauty in this project is that you have the ability to fill in without messing the entire project up!
Here is the finished product and I lurrrrrve it. I ended up taking a sheer ribbon and tied it at the top of the wreath. I have seen some that have glued their ribbon to the back of the wreath and hung it that way. I don't know where it's going to go permanently as I mentioned, it's too fat for my front door. (Side note.....my BT warned me when I started this wreath that it would be too thick. I don't listen.)
Ahhhh. Now that I've posted these pics........I see a few holes. Back to filling tonight!
Here's project breakdown:
White Styrofoam Wreath - 7.99 - 3.20 (40% coupon) = $4.79
Hot Glue Gun and Glue - Already on hand = FREE
Coffee Filters (2 pkgs) - $2.96
TOTAL - $7.75
Good Luck with your own and let me know how it goes!
xo,
M


No comments:
Post a Comment